|
Technique: Creating Burned-in Timecode
[This article was first published in the
July, 2006, issue of
Larry's Final Cut Pro Newsletter. Click
here to subscribe.]
John Ramsden, of the BBC, provided the
following technique:
The next is for creating burnt-in timecode. Back when
we had Lightworks we could play out with burnt-in timecode,
and we could display both source and timeline timecodes
at the same time. The Avids that replaced Lightworks couldn't
do any burn-in at all (unless you played through a DigiBeta
or DVCam) FCP can, but it has taken me a while to get both
timecodes on the output.
There are timecode readers and generators in Effects >
Video filters > Video. The reader reads source timecode
and can be dropped on the viewer or timeline, the TCR part
can be modified (for example, Cam 1). The timecode generator
will generate timecode from zero or a preset start time
(for example, 10:00:00:00). The most useful way to use this
is on the timeline. Edit ‘Slug’ on a spare video
track above the whole timeline, drop timecode generator
on it, change start time if necessary, apply luminance key
to ‘Slug’ and change to key out darker. You
can change the colour of the box the timecode is on, and
see it, so long as it isn’t completely black.
Larry replies: John, these are two good techniques.
But you don't need the slug.
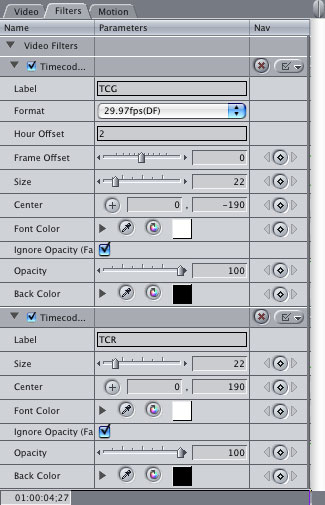
If you need to output a single long clip, apply both timecode
filters -- Effects > Video Filters > Video >
Timecode Generator and Effects > Video
Filters > Video > Timecode Reader -- to the
same clip, then change the position of one of the filter.
The image above illustrates this.
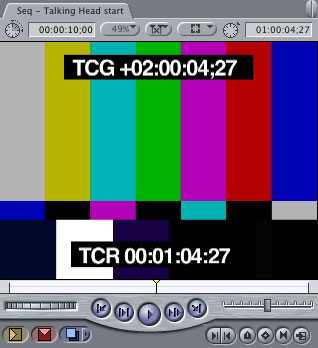
This is what the results look like in the Canvas.
If you need to output a sequence, create a nest -- Sequence
> Nest Items -- and apply the filters to the nest.
The benefit of applying the filters directly is that this
significantly decreases your rendering and exporting time.
Also, for the record, the image sizes for video are:
PAL 4:3 720 x 576
PAL 16:9 720 x 576 when Anamorphic is checked
PAL 16:9 1024 x 576 To convert in Quicktime when anamorphic
is not checked
NTSC 4:3 720 x 480
NTSC 16:9 720 x 480 when Anamorphic checked
NTSC 16:9 834 x 480 To convert in Quicktime when anamorphic
is not checked
This tip is from the July,
2006, issue of "Larry's Final Cut Pro Newsletter," a very cool
FREE monthly Final Cut Pro newsletter -- subscribe at Larry's
web site: www.larryjordan.biz.
Larry Jordan is a
post-production consultant and an Apple-Certified Trainer
in Digital Media with over 25 years experience as producer,
director and editor with network, local and corporate credits.
Based in Los Angeles, he's a member of both the Directors
Guild of America and the Producers Guild of America.
Any references to trademarks
or products are used for editorial purposes only. Text copyright
2006 by Larry Jordan and Associates, Inc.. All rights reserved.
REPRINTED WITH PERMISSION FROM AUTHOR
|
